EXAMPLE TREATMENT PATTERNS
The following are examples of the many Touch Techniques and treatment patterns available in Roberta's Publications and discussed in greater detail in her THCC bi-monthly Newsletter.
SELF-MINISTERED ACCUPRESSURE PATTERN
TO RELIEVE LOW BACK PAIN
A video accompanying the following written instructions is provided to assist in the performance of the pattern. Click on the video below to watch Dr. Anderson demonstrating the pattern.
While standing or sitting in a backless chair, you will begin the Self-ministered Acupressure Pattern by applying, with a firm touch (same pressure it would take to snap your fingers), the tip of the index finger of each hand to the Points indicated on the figures shown below.
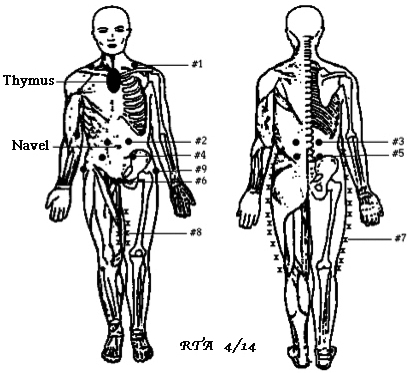
Starting with Point #1, begin by pressing your index fingers on each of the points located on both sides of your body at the same time (in unison) in the numbered order. As you hold each point, rotate your index fingers simultaneously in a clockwise motion maintaining contact with each point for at least 20 seconds. Continue this process moving to each of the numbered Points. When a particular point is found to be sensitive remain on that particular point until the pain diminishes, but no more than a minute, then go on to the next point. Proceed through all 5 points using your index fingers.
Point #6 can best be accessed by bringing all your fingers of both hands in a straight horizontal line with the fingertips even and place all 8 finger tips horizontally on the pubic bone, all at the same time. Maintain an even pressure across the entire pubic bone. Hold for at least 20 seconds, but no more than 60 seconds. Some people find this area to be quite sensitive. If so, hold until tenderness begins to subside.
Now move to the Points marked with Xs rather than numbers located on the outside and inside of the upper legs. Begin by applying equal pressure to the outside of both legs working in unison from the top of the hips as you travel down the outside of your legs to the knees. Then work on the inside of the legs moving upward from the inside of the knees to the groin area. You may find that the X marked Points located on the inside of the legs are more tender. In those cases be careful not to press too hard to avoid bruising the skin. When you find a sensitive spot stay on that spot for 60 seconds or until the tenderness begins to subside. Then move onto the next sensitive spot and do likewise.
Complete the Pattern by placing two fingers in the last numbered Point #9 at the hip joint on each side of the body and bend slightly back and forward pressing a little firmer each time until the pain (if present) is reduced. (It is suggested that this be done at least 10 times.)
When you have concluded applying pressure to all nine Points in the Pattern; tap the thymus, which is found on the front of the chest just below the breast bone area (see oval spot in the diagram), three times with the fingers of your right hand and then hold the open palm of your right hand over your navel for a count of three. This concludes the Self-ministered Acupressure Pattern.
Remember to repeat this self-ministered Pattern at least two times a day (shortly after rising and just before going to bed) until relief is experienced and then as often as is required to maintain absence of pain. An additional Pattern mid-day may be needed to assist in the healing process. Be sure to drink plenty of water to help flush your system. If you have need of additional instruction in performing this Pattern contact me at: info@healthcareconnection.com. Users of this Pattern are urged to keep their health care provider informed about their progress so that prescribed medications can be adjusted as needed.
FEVER RELIEF
During times of trauma, illness or surgery you may experience a fever. Inflammation in specific locations or infections can also trigger this condition. A temporary relief and possible first line strategy to reduce the fever might be considered. The Governing Vessel meridian, point GV #14, located at the center of your back at the base of your neck bone, can be stimulated to bring about relief. (See illustration.) Holding this point while alternately holding the toes of each foot should bring about the desired results.
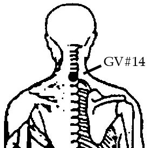 When assisting another person it may be difficult to access this point with your fingers so it is best to place the palm of your hand on GV #14 located on their upper back while they are in a seated position or have them lay on their side. While holding GV#14 with the palm or fingers of one hand run your other hand down the front of one of their legs until you reach their toes. Hold your fingers over the toes until you feel them pulsing. While still holding the back of their neck, move your fingers down the other leg until you reach their toes. Hold this position until they pulse. For best results it is advised that you repeat this pattern several times over the course of an hour.
If you are applying this technique to yourself you can place one hand on the back of the lower part of your neck where the GV #14 meridian point is located and reach for each foot separately, holding the toes of that foot until you feel a pulse. It is necessary to feel for the pulse in toes on both feet before the pattern can be completed. It is best to do this while sitting in a chair.
Remember that fever is the body’s way of protecting itself. However, if the fever rises or lasts for several hours, you may need to seek additional attention. If this temporary relief technique does not bring about the desired results in a few hours be sure to check with your health care provider. Unchecked fever can result in serious health-related problems.
SEVEN POINT SELF-MINISTERED ACUPRESSURE PATTERN
TO RELIEVE NECK & SHOULDER PAIN
When you are assisting another, begin by standing behind the person to receive the pattern while they sit in a backless chair.
 Then place your index fingers on each set of points in the numbered order. Hold each set of points for at least 20 to 60 seconds. Remember if any point is tender rub the point in a clockwise fashion and hold for another 20 seconds.
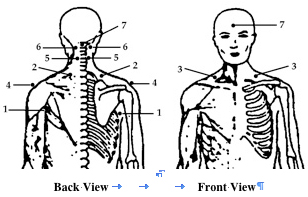
Point #1 is found under the armpit against the body not on the arm.
Point #2 is found on the fleshy part of the back of the shoulder close to the back bone.
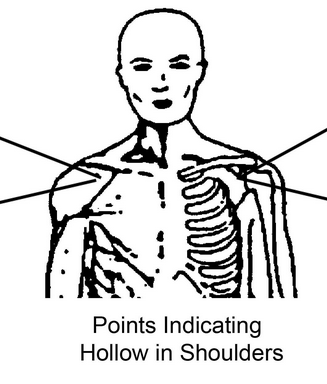
Point #3 is found in the hollow of the front of the shoulder.
Point #4 is found on the crest of the shoulders.
When you get to Points #5 & #6 place your left hand on the forehead of the person receiving the pattern while you use your thumb and index finger to hold the two points on either side of the neck.
Point #5 is found on the back of the neck half way between the shoulder and the head close to the neck bone.
Point #6 is found on either side of the head at the base of the back of the head.
Point #7 has two different locations. One is at the nap of the back of the neck and the other at the center of the forehead. Place the index finger of your right hand on the point in the back of the head and the left index finger on the center of the forehead and hold until the person receiving the pattern relaxes. This last set of points may take longer than 60 seconds. When you have completed all Points sit back and relax for a few minutes. This concludes the Acupressure Pattern.
To Self-Minister The Pattern
When you are self-ministering this pattern raise your elbows and in a hugging movement (arms crossed over your chest) reach for the points located in your armpits. Remember Point #1 is found on your body not on the inner side of your arm.
Each point should be held with the fingers of the opposite hand. (Left hand on right side of the body and vise versus.) If this is too difficult then use the hand on the same side of the body. Continue the pattern as described above. If self-ministering this pattern you may sit or stand.
Remember to repeat this self-ministered Pattern at least two times a day (shortly after rising and just before going to bed) until relief is experienced and then as often as is required to maintain absence of pain. An additional Pattern mid-day may be needed to assist in the healing process. Be sure to drink plenty of water to help flush your system. If you have need of additional instruction in performing this Pattern contact Dr. Anderson at: info@andersonandassociates.org. Users of this Pattern are encouraged to keep their health care provider informed about their progress so that prescribed medications can be adjusted as needed.
Touch Technique to Relieve Congested Sinuses
Sinus Release
This pattern can be self-ministered. However, if another person is giving the release, they can stand at the back of a seated receiver, or if the receiver is lying down, the giver can stand at the receiver's head.
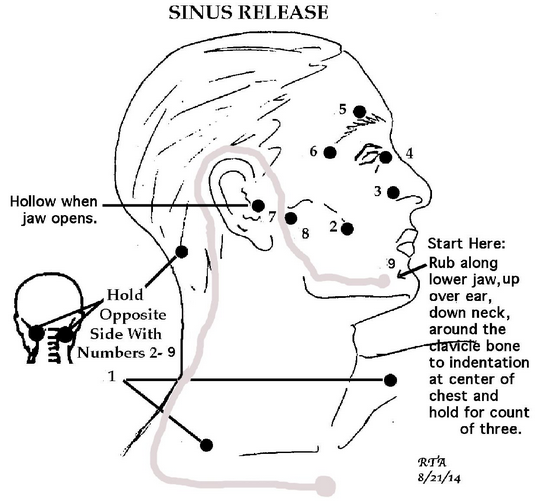 To self-minister the pattern: Start by placing the fingers of the left hand in the hollow of the right shoulder and the right fingers in the hollow of the left shoulder and hold for a count of 20 while breathing naturally. (Note points marked by the number 1(Lung Meridian) in the illustrations.
 As you proceed though this pattern you may find certain points more tender than others. Never apply more than 2 pounds pressure to any point. This is the equivalent of the pressure to snap your fingers.
While holding the point on the right side of the back of the head with the fingers of the right hand, start the pattern on the left side of the face with the fingers of the left hand. Hold each point for at least 20 seconds or until you feel an energy pulse. Proceed with point #2 moving through to point #8, holding each for 20 seconds.
Still holding the point on the back of the right side of the head, begin to rub (using the fingers of your left hand) with circular motions along the path indicated by the gray line in the illustration starting at the center of the jawline. Continue to move up the jawline past the front of the left ear into the temple area and then around the ear and down the side of the neck, continuing around the clavicle until you reach the hollow in the chest in line with the end of the clavicle bone. Hold for 20 seconds while breathing normally.
When you have finished applying pressure to the points on the left side of the face. Then switch your attention to the opposite side of the face and back of neck. Place the fingers of the left hand on the point on the left side of the back of the head while you apply pressure to the points #2 through #8 on the right side of the face as indicated in the illustration. Finish with the rubbing of the right side of the face and nexk as done previously on the left side of the face.
When you have completed both sides of the face and neck, sit for a few minutes and breath normally. If the pattern was successful you will experience a draining of the congestion felt in the sinuses.
To get full relief using this acupressure pattern it may need to be done more than once. When using this pattern on myself I self-minister it twice a day until my sinuses are clear.
Touching Techniques To Assist In The Healing
Of Diagnosed Intestinal Ailments
Constipation and/or Diarrhea: Internal Exercises were designed by the early Chinese sages to energize the entire body, balance the energy levels, and promote a more effective functioning of the internal organs of human beings. They are deceptively simple and unfailingly effective. They are based upon characteristic movements of three animals noted for their longevity and powers of self-healing. These Internal Exercises are named after the animals from which they are taken — The Deer, The Crane, and The Turtle. They were arrived at through literally 6,000 years of observation and study of the natural principles of healing.
 The Crane Exercise was developed to strengthen and energize the internal system, including abdominal muscles, internal organs, lungs and circulatory system. The exercise was named after the Crane because it appears to be constantly stimulating its abdominal area. As it stands, the crane alternately folds first one knee and then the other into its belly, exerting pressure on its abdominal muscles and internal organs. It is believed that this activity stimulates and strengthens its digestive, respiratory, eliminatory and circulatory systems.
When applied with circular motions on the abdomen, this effortless two-minute Crane exercise will assist in regulating the eliminatory system of anyone experiencing Constipation or Diarrhea and is known to bring relief. This technique will be discussed in one of my monthly free The Health Care Connection Newsletters. Be sure to sign up to receive the next issue.
Reducing Pain From An Injury or Accident Without The Use Of Drugs: There is a therapeutic touch technique when applied reduces the inflammation associated with the injury and is known to bring about pain relief. This technique will be discussed in one of my monthly free The Health Care Connection Newsletters. Be sure to sign up to receive the next issue.